


The repair will only be as good as the adhesive you use
Tutorial: Eames Lounge Chair Shock Mount Repair
The Eames Lounge chair was designed and introduced by Ray and Charles Eames around 1956. The Eames mid-century modern furniture embodies luxury, comfort and exquisite elegance in its design. In attaching the back to the base, Eames avoided the use of bolts, choosing to attach the plywood pieces by gluing a rubber shock mount between them. Sooner or later, the shock mounts will fail.
The neoprene gets old and oxidizes - the rubber gets brittle and powdery, and nothing can be glued to it. When the bond of the shock mount separates, the unlucky person can fall backward and lands with their back on the floor causing harm to both themselves and the chair.

Repairing a Herman Miller Eames Lounge Chair.
Repairing the broken shock mount really means replacing the broken shock mount. There is no way to successfully repair or reglue the mount using the old original parts. Many have tried, most all have or will quickly fail. Performing this repair correctly is what this magnificent chair deserves and it's the only way to ensure longevity as well as maintaining the value of this highly sought after mid century modern masterpiece.
To begin the repair. disassemble the chair base and shell. This is not overly difficult to do.
Follow these steps
- Slide the seat cushion forward and remove.
- Remove the armrests, two screws on each, from the outer underside.
- Remove the two inside screws from the steel arm brackets.
- Remove the base to make the repair project easier.
The chair is now ready for repair. Before we begin, you'll need to order a couple items online. I won't suggest where to buy your new shock mounts because The Refinishing Studio has no affiliation with these suppliers. Do some research, there are several to choose from and I suggest ordering mounts similar to the originals to maintain the original design integrity of the chair.
Secondly, you will need adhesive. Here, there is only one choice for me and I'm sorry it's so expensive but for me no other adhesive will do for this rubber to wood bond. 3M Scotch Weld two part epoxy adhesive 1838 B/A green. Purchase the 2 oz. pack and you will have plenty left over. You can find it HERE on Amozon.
What You Will Need To Order:
- 3M Scotch Weld two part epoxy adhesive 1838 B/A green.
- Replacement shock mounts similar to originals.
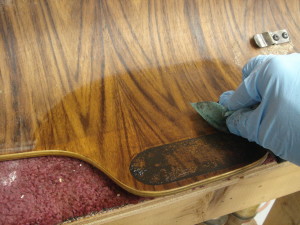
Now we can begin the tricky aspects of this repair. The remaining broken rubber mounts will have to be carefully removed from the inside of the seat shell tabs. Each situation will differ, but normally you will have glue residue and rubber residue that will remain on the shell, as seen in this picture.


Using proper precautions such as gloves and a mask, wet a Sotch Brite pad with solvent to break down the rubber and glue. Use a scotch brite pad or fine steel wool and begin with mineral spirits or naptha. Confine your scrubbing to just the repair area and rub in circular motion.
Clean with a rag and examine the rag to see that it's turning black. If so, continue the above mentioned process until most or all residue has been removed. If the rag does not turn black, switch to a different solvent such as acetone. Lastly, you can use lacquer thinner but this solvent will also remove or damage the finish so I use it as a last resort.

Once your shell looks similar to the one pictured to the left, you are ready to proceed to the other side and repeat the process. You want both sides clean of residue.
Lets begin attaching the new shock mounts
It's time to open up that box of expensive glue. It's a shame really, that the smallest amount you can purchase is the 2 oz kit ( 4 oz total). We certainly don't need much but trust me when I say the $60 bucks is wort it! This adhesive is the bomb for this job.


Follow the instructions, and mix your two part epoxy using equal amounts of part A and part B. Don't mix to much, as a lot is not needed and you can always mix more if you need to.
Tape out the outline from the original shock mount. Spread your epoxy as shown in picture. Don't go all the way to the edge and don't overdue it, you don't want the adhesive to squeeze out when you clamp it up.


This next step I went about a little differently than most do, and I did so for a reason that made sense to me at the time 🙂 I choose to attach the metal brackets to the new shock mount first - than clamp the shock mounts in place.
It's easier to clamp the shock mounts only, and wait until the epoxy cures before attaching the brackets. I however, wanted to be absolutely certain everything was strait and perfect because it was a client's chair and well, that's just how we roll.
Everything is all clamped up and I've decided I'm happy with the positioning of the brackets. Now it's time to leave it to cure. Don't be in a rush to assemble the chair. I let it sit a couple days before removing the clamps. It's a large investment in both time and money. It doesn't make much sense to not give it extra curing time just to be sure.


After adequate cure time, attach the back using the two screws you removed upon dis-assembly.
Assemble the lounge chair by simply reversing the steps of dis-assembly. The chair is now repaired and you can trust the repair will last knowing you went about it correctly and you used the proper adhesive (perhaps the most important aspect of this job)

