How To Strip A Dining Room Table
In this tutorial, We'll show you our step by step process of how to easily and efficiently strip a dining room table . Removing the finish from a wood table doesn't have to be hard, and anyone can do it !
Video Information
How To Strip A Dining Room Table
With any refinishing project, removing the finish is the single most important part of the job. It has to be done correctly, or your job will likely turn out very poorly. Because stripping is not the "fun part" of most refinishing projects, we need to get through it as efficiently as possible. Let me show you how I go about stripping this table...and make very fast work of it.
I have been refinishing furniture for almost 30 years now. I hate to admit it, because it makes me sound old....but it's true. It probably comes as no surprise that my least favorite aspect of the job is stripping, yet I find myself doing it almost daily.
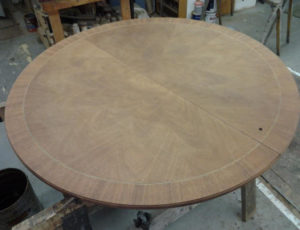
Below: This is our victim, a rather large Mahogany Dining Room table.
I will be "hand stripping" this table, being sure to do this job using proper precautions. Strip in a well ventilated area, using chemical resistant gloves and a good respirator that can be purchased here through Amazon. A long sleeve shirt and long pants are always a good choice, even on hot days. Also, be sure to wear protective eye wear to guard against splashing stripper or solvent in your eyes.
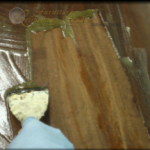
With a bristle brush, liberally spread the stripper over one half of the table. A good paste stripper to use is this one here I've linked too, and it's cheaper buying on Amazon than driving to the local box store. It comes in a blue and red can and can't be purchased at my local home improvement stores so I order it using my free prime shipping. It takes a few days longer though, so plan that into your project. That is the product I will be using in this episode. Don't be stingy when applying the stripper....lay it on thick!!
Here is something you need to know about paint stripper that very few people realize (including the "experts" online or at the hardware store), and it will save you hours of frustration and a lot of money.
Don't bother following the label's recommendation for how long to allow the stripper to penetrate the finish before removing! The label is almost always wrong and suggests you wait too long! In this case, the label on the stripper says "allow 15-30 min before scraping a small area to see if the finish is ready for removal". That is crazy!!
I always test it within 5 minutes...no longer. If the finish isn't soft within 5 minutes (and it usually is) I apply a second coat of stripper and give it 5 more minutes before testing again. In many cases, stripper will dry within 10 minutes, making it extra difficult to remove. I like to keep it wet until the finish softens. In this case, 5 minutes is all it took.
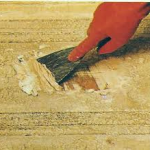
Below: Once the finish softens, remove it using a scraper or putty knife and scraping it off moving in the direction of the grain when possible.
Continue until all the finish is removed. You may find that there is still finish in a few areas that did not scrape off. Just re-apply stripper to those areas and repeat the process.
Below is what you will be left with after scraping the stripper off.
Below: It's now time to clean the table. We will do this using lacquer thinner. You can get lacquer thinner here through Amazon. OR at your local hardware store. I find the prices to be around the same. and either these stripping pads or #3 steel wool. Pour the lacquer thinner into a container and dip the scrubbing pad into the thinner. Scrub the table moving the pad in circular motions.
Lacquer thinner evaporates and dries quickly, so you should work in sections about the size of 1/4 of the table top. After scrubbing, clean the surface with a rag moistened with lacquer thinner. Follow that up by wiping down the surface with a clean dry rag.
Below: After cleaning the first half of the table, it should look like this.